How does fluorescent paint work?
The art of scale modeling requires a constant search for realism, visual impact, and extreme attention to detail. To achieve dazzling special effects on our miniatures and dioramas, such as power swords, headlights, cybernetic control screens, or deadly pools of toxic waste, modelers often turn to special materials. Among them, the most popular option is paint with special light-reactive properties. However, when applying it to our scale models and resin pieces, questions often arise about its physical and chemical properties. Understanding what it is and how fluorescent paint works will allow you to apply these effects with greater control and better results.
The science behind the glow: the secret of photons
To understand how to make the most of this resource in our modeling workshop, we must first answer the key question: how does fluorescent paint work exactly? The answer lies in physics and in the behavior of light waves. Fluorescent substances have the ability to absorb ultraviolet (UV) light, which is invisible to the human eye, and re-emit it almost immediately as visible light.
This amazing process occurs when the invisible energy from black light or ultraviolet light excites the electrons found in the molecules of the paint pigment, raising them to a temporarily higher energy level. When these electrons relax and return to their original ground state, they emit that excess energy in the form of light at a longer, visible wavelength.

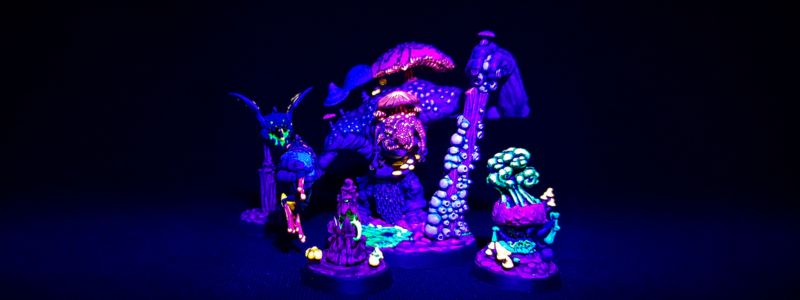
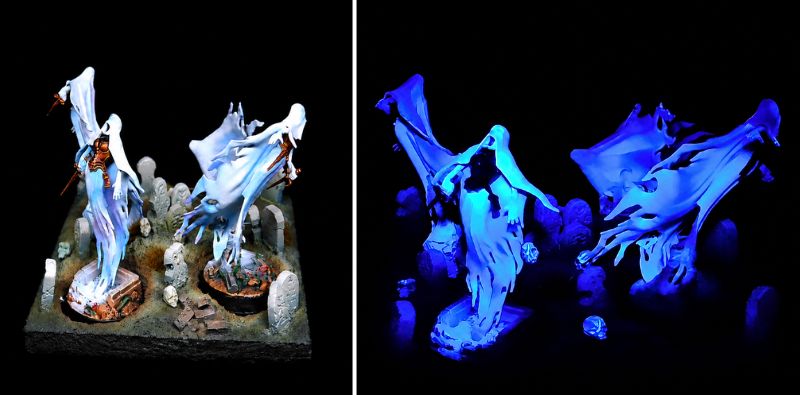
Thanks to this rapid phenomenon, the resulting colors appear incredibly bright and pure during the day, and give off an intense glow when exposed directly to a black light lamp. That is why these colors are perceived as more vivid and striking than many conventional acrylics, especially over light-colored bases and under UV light. As a result, in the world of wargames, scale models, and dioramas, their strategic use allows us to create very powerful focal points in our projects.
Differences between fluorescent and phosphorescent paint
It is easy to confuse the terms fluorescent and phosphorescent, not only because their names sound similar, but also because both types of paint are luminescent. For that reason, before you start painting, it is important to understand the differences between fluorescent and phosphorescent paint.
Although both types of paint use the physical phenomenon of luminescence to glow, their behavior when absorbing light and managing time is completely different. In the case of fluorescent material, the glow effect fades immediately as soon as the excitation source disappears; in other words, the moment we turn off the ultraviolet flashlight or bulb.
By contrast, phosphorescent pigments, which are very common in paints used to recreate ghosts or specters on miniatures, work in a very different way: they can be charged with sunlight, artificial light, or ultraviolet light, and then release that energy slowly in the dark. This means the glow remains visible for minutes or even hours after the light source has stopped.
In short, if your goal is to paint the instrument panel of a 1:72 scale aircraft cockpit so that it slowly glows when you turn off the room light, the right option for your project is phosphorescent paint. But if what you want is an extremely bright color with a clean and vibrant tone, ideal for standing out under the black light installed in your diorama display case, fluorescent paint is the perfect technical choice.
The big myth about fluorescent paint in the dark
Directly related to the previous section, there is a very widespread myth among beginners who apply these pigments for the first time on their resin or plastic figures. Many expect to see their model glow intensely just by turning off the workshop light. However, it is important to make clear that fluorescent paint in complete darkness does not emit any kind of light on its own and will become completely invisible to our eyes.

As we have explained, fluorescent paint does not naturally glow on its own by storing light. To achieve the characteristic luminous effect of fluorescent paint, you will need a source of UV light or black light. Under normal lighting conditions, it can also look very intense, but it will not glow the way it does under UV light. In absolute darkness, it will not emit light.
Difference between neon and fluorescent paint
To continue refining our knowledge of these materials, it is useful to stop and understand why we sometimes see “neon paint” on product labels for scale modeling supplies. Sometimes, in the world of arts and crafts, both terms are used as synonyms, but they do not necessarily mean the same thing. In fact, the name “neon paint” is a commercial name because this type of paint resembles the vivid colors used in neon signs, which are created with light and gas.
Therefore, many paints sold as neon are fluorescent, meaning they are reactive to UV light, but you should not always assume that this is the case. The best option is to check the label and see whether the product indicates “fluorescent,” “UV reactive,” or “glow in the dark.” In any case, for the practical purposes of our hobby, the ideal surfaces, necessary backgrounds, and application method for neon and fluorescent paints can be very similar.
How to use fluorescent paint: preparation
If we want to apply these reactive pigments to resin, plastic, or white metal pieces, we cannot proceed in the same way we would with a conventional acrylic paint or an enamel. Mainly, this is because this type of luminous paint usually has a somewhat more translucent texture and does not offer the same level of opacity or quick coverage that we are used to with other products.
In most scale modeling projects, the easiest way to get the most out of fluorescent paint is to apply it over a white base or a very light-colored base. Solid white reflects light waves the most and the best, and since the fluorescent color layer acts on the miniature almost like a colored translucent filter, the light must pass through the fluorescent pigment, bounce off the pure white primer underneath, and return toward our eyes.
If you apply this paint directly over a black primer, which is very common on fantasy figures, over dark gray, or directly onto the bare plastic of the sprue, the final color will become completely muted, look dirty, and lose all its luminous power, ruining the effort you put into it.
Of course, it is crucial to carefully prepare the surface before painting, making sure the miniature is clean of dust, sanding debris, or finger grease before applying the white base; this will prevent the base coat from cracking or peeling off during handling. Pure white usually offers the cleanest and most intense result, although you can also use light-colored bases, gradients, or white light points depending on the effect you are trying to achieve.
Application techniques with an airbrush and a brush
Once your piece is polished and primed in a bright white, it is time to apply the color. The method most often recommended by experts is to apply the paint in thin, successive layers, preferably using an airbrush to guarantee even, smooth coverage free of buildup.
If you choose to use your airbrush, apply thin passes and allow the water, thinner, or medium to evaporate properly between each pass. A very common mistake in scale modeling is getting impatient and trying to cover the entire surface in one very thick coat, which will cause pooling, loss of fine sculpted details on the figure, and uneven brightness. The ideal approach for achieving a professional finish is to let the piece dry between each layer. Drying time will vary depending on the brand, dilution, humidity, temperature, layer thickness, and surface.
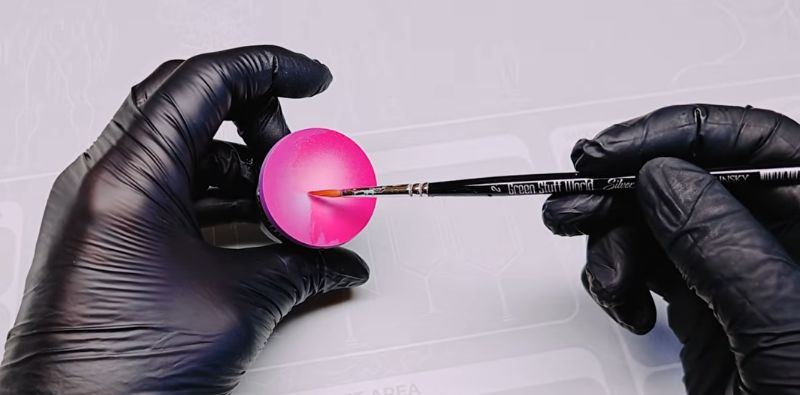
On the other hand, if you prefer or need to paint with a brush to highlight tiny details, such as the glowing eyes of a mutant creature, the buttons on a control console, or magical inscriptions on a sword, you should thin the paint very carefully and apply glazes or soft, translucent layers successively until you see that you have reached the desired light intensity. Fortunately, the vast majority of these paints designed for scale modeling are water-based acrylics, so the initial touch-dry time is fairly quick, although, once again, the exact time depends on several factors.
Pigment degradation and how to protect your scale models
Beyond the painting process itself, there is a critical chemical factor that every modeler should keep in mind when displaying their work: the vulnerability of these luminescent pigments. How does fluorescent paint behave over time when exposed to environmental agents? Unfortunately, vibrant fluorescent colors are extremely sensitive to direct sunlight, so they tend to fade and lose their glowing ability much faster than normal acrylics.
The sun and its constant radiation “eat away” at the color of our pieces because the continuous impact of the rays chemically breaks down the molecules in the fluorescent dye. To prevent the torches, headlights, or energy effects on your miniatures from losing their vividness over the months, you should always apply a protective varnish, and it is essential to use one that contains filters against ultraviolet (UV) rays.
Polyurethane varnishes, or those specifically formulated to resist UV damage, can extend the lifespan of the luminous effect. In areas that represent light, energy, screens, liquids, or crystals, a satin or gloss finish can reinforce the luminous sensation. On the rest of the miniature, you can keep matte finishes so you do not lose realism. Keep in mind that some resistant varnishes can take anywhere from 24 hours to an entire week to fully cure and harden.
Other considerations about how fluorescent paint works
When exploring new lighting techniques, such as the famous Object Source Lighting (OSL), where an object on the model itself is simulated as projecting light onto its surroundings, many modelers wonder whether it is possible to mix these reactive tones with their standard acrylics. The answer is yes: you can mix fluorescent paint with conventional paints, as long as they share the same base composition, for example, always mixing water-based acrylic with water-based acrylic, in order to avoid adhesion problems, texture issues, separation in the mixture, or uneven drying.
However, you should do so with caution and understand that gradually adding a normal, fully opaque color to fluorescent paint will reduce the intensity of its fluorescence, resulting in a much more muted or pastel-toned color. Far from being a problem, this reaction can be used as a technical advantage if you want to create a very realistic gradient effect, where the intense fluorescent light at the core of an object appears to fade and soften gradually as the illumination moves away from the source point.
It is also extremely interesting to experiment by mixing different fluorescent tones with each other to create completely customized and unique colors for your project. In scale modeling, fluorescent yellows, greens, oranges, and pinks are usually among the most visually striking tones, although the actual intensity will depend on each brand’s formulation and the light used. Combining them strategically will allow you to obtain subtle yet visually impactful nuances.
Finally, to keep your jars and bottles in perfect condition and prevent the properties of the paint from degrading before it even reaches the palette, make sure to store them tightly closed in a cool, dry drawer or cabinet. Always keep them away from direct sunlight and intense sources of heat that could break down the delicate pigment inside the container itself.
Understanding how fluorescent paint works and mastering the physical properties of light on our figures is a challenge, but it can make the difference between a more professional finish and a more basic one. By applying thin layers of paint, ensuring immaculate white backgrounds, and protecting the result from sunlight and other environmental agents, you will generally ensure that your scenes draw every eye thanks to their realism. Whether you apply it to futuristic vehicles, monsters from fantasy worlds, or cyberpunk-style dioramas, mastering ultraviolet light will undoubtedly become one of your most powerful tools as a modeler.
Share this content