What is primer paint?
Primer paint is a base coat to a surface before painting it. The goal is to enhance paint adhesion, seal porous surfaces for uniformity and even paint absorption, and ensure a durable finish. It acts as a bridge between the surface and the paint, helping the paint bond correctly and preventing issues like early peeling due to poor surface adhesion.
Beyond improving adhesion, it also helps to hide blemishes and reduce the number of paint layers needed for full coverage. It's especially useful on new surfaces, restorations, or deteriorated paint (provided the area is properly prepared—cleaned and sanded as needed). This technique is used in various fields where painting is key, such as construction, automotive, or, in our case, modeling.
Before you start using primer, especially if you've never done it before, many questions might pop up about the different types of primers, the number of coats, how long to wait before painting, how to apply it correctly, or what color is right for each case. Below, we'll answer all these questions step by step.
When to use primer?
Primer paint is applied to new, porous, repaired, or deteriorated surfaces before applying the final paints. It's also used when you're drastically changing the surface color to ensure even coverage and prevent the old color from affecting the new finish. However, if you're going to completely change a miniature's paint job, the best option is to use a solvent to remove all current layers and start from scratch.
Furthermore, the base coat is essential on challenging surfaces like metal, plastic, or glass, where paint might not adhere properly without adequate preparation. In these cases, it guarantees a durable and resistant finish.

Why is primer applied before painting?
Applying it before painting is good practice when aiming for a professional paint finish. Its functions are:
• To enhance paint adhesion to the surface.
• To seal porous surfaces, preventing uneven paint absorption.
• To provide a uniform finish, reducing the number of layers needed.
• To extend the durability of the finish, protecting the underlying surface.
How long does primer take to dry?
The drying time varies depending on the product type and environmental conditions. Generally, they're usually dry to the touch in about 20 minutes. However, for a complete cure, it can take up to 24 hours. It's crucial to check the manufacturer's specifications for optimal results.
It's important to keep in mind that factors like temperature, humidity, and room ventilation can affect drying time. Make sure the surface is completely dry before applying paint to avoid adhesion or finish issues.
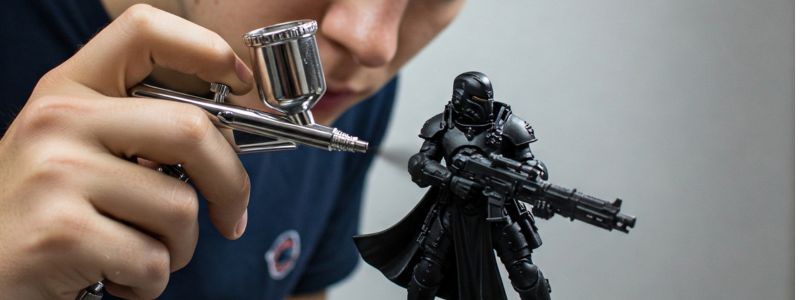
How to apply primer?
The base coat can be applied with a miniature paint brush or an airbrush. An airbrush is much faster, but a brush allows you to apply it to a specific area of the miniature or diorama. Additionally, using an airbrush requires specialized equipment and skills that not every artist has. On the other hand, there's spray version, which is very popular for its speed and ease of use, and it's also handy when you need to prime an entire project rather than just a part of it.
It's recommended to apply an even coat and let it dry completely before painting with the final color. In any case, the correct application of each primer depends on the product's characteristics, so the best way to do it is to follow the manufacturer's instructions and figure out the most suitable method.
What color is primer paint?
Not only is it necessary to know priming correctly to achieve a good final result, but choosing the right color for the first coat will also make a difference.
• Black: This is most useful for painting with metallic colors, dark finishes, or dramatic effects. Its use in modeling is highly valued because it allows for natural shading effects with techniques like "Zenithal Highlighting", as well as hiding mistakes and creating natural shadows in hard-to-reach areas. It provides a good finish for most colors, especially dark ones, though you'll need to work more on highlights and lighter colors.
• White: This highlights light, bright, pastel, or vivid colors. It's useful when you're aiming for a clean, saturated finish. Another way to achieve this is to apply a black coat and then use white with a slight angle on the part of the figure where the sun's light would hit (zenithal lighting). This helps guide the shading and highlights during painting.
• Gray: This is more balanced for mixed projects where you don't want an effect that's too dark or too light. It's a good option for use with gray paint, dark greens, browns, etc.
• Other colors: There are primes in other colors that are used when a large part of the surface will be a specific color, even though they will also work well with white or black: use brown primer paint if the mini is predominantly red (large red armors), use dark green one if green will predominate (Orcs, Goblins, or a military green or camouflage surface), etc.
Primers for painting with chrome effect paints
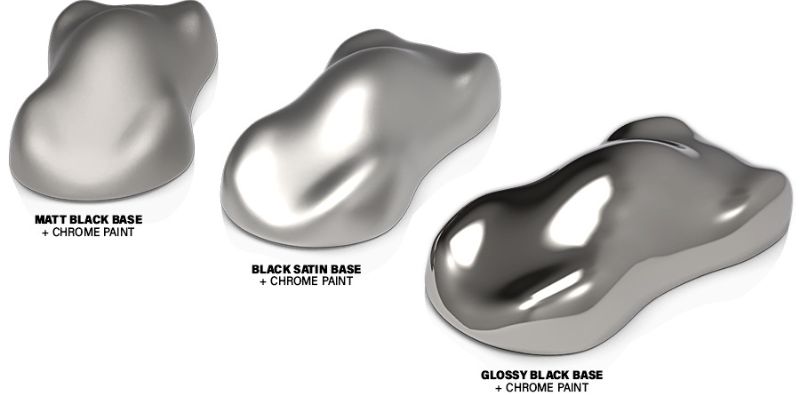
There are primers with different effects, which will impact the final result after painting. It's especially important to choose the type of primer finish if you're going to paint with specific effect paints, like spray chrome effect paint.
| Type of Primer | Result |
| Matte Black | Burnished Metal |
| Satin Black | Metallic |
| Gloss Black | Mirror Effect |
How long does the primer last?
The durability of a bottle of primer paint depends on many factors, making it very relative and practically impossible to determine. The factors involved in its duration are:
• Bottle size
• Size of the miniatures to be primed
• The number of coats per miniature
• Using thick or thin coats
• Apply it with a brush (more paint), airbrush (diluting the primer), or spray.
• If you dilute it a bit to make the paint go further.
• Using a palette for painting, excess paint is lost.
If you prime a miniature or surface, it can remain in good condition for months, even years, if it's not painted immediately. However, after 24-48 hours, dust will have accumulated, and you'll need to clean them thoroughly before painting.
How much is it?
The price of a bottle can vary greatly depending on its size, format, brand, finish, and even color. A liter can cost from just over a euro in larger containers to €50 for a special or high-performance one. It's important to consider the quality and suitability of the product for the type of surface and paint you'll be using. In fact, investing in a quality product can save you time and money in the long run by reducing the amount of paint needed and increasing the durability of the finish.
That's why we recommend Green Stuff World's acrylic priming or spray primer, especially if you're looking for an affordable yet high-quality product for miniatures and dioramas. We offer various colors, sizes, and finishes so no project is left without the right base coat product. You can purchase them at the official GSW store, one of our worldwide reseller stores, or on our official profiles on Etsy or eBay marketplaces.
Types of surfaces for priming
Normally, miniatures for role-playing games are resin for 3d printers, to which you need to add a base (wood or plastic) and accessories made of other materials. Also, for those who still have old figures, they might be made of white metal. This is why it's important to distinguish between the different materials you might encounter in the world of modeling and how to treat them.
• Resin: If you 3D print at home with resin, it's important to wash the miniature thoroughly with isopropyl alcohol (IPA) before priming. Green Stuff World's acrylic or spray primer is a good option for these minis.
• White Metal (old miniatures): Products for resin are usually compatible with these types of miniatures, though there are also specific products for metal. Without a priming, the paint won't stick to these types of surfaces.
• Plastic (polystyrene, ABS): Acrylic or polyurethane primer paint is recommended.
• MDF: This is mainly used for bases. It's an absorbent material, so it needs a water-based sealing primer paint or wood filler before painting, although it's fully compatible with acrylic one, so you can use the same product for miniatures and bases.

Essential tips for beginners
Although applying one or more coats isn't particularly complicated if you've never done it or are just starting to experiment with this process, you should be clear on some basics:
1. Clean your miniatures before priming: Grease, mold residue, or dust can prevent the primers from adhering correctly.
2. Apply thin coats: Especially on miniatures with many details. It's better to apply two light coats than one very thick one. This way, it will be fully covered, including the smallest or most hidden details and recesses.
3. Shake the spray can or mix the bottle's contents thoroughly: Poor mixing causes drips, bubbles, or a bad finish.
4. Maintain the correct distance if using spray: About 8-12 inches (20-30 cm). Don't get too close, or drops will form on the surface.
5. Let it dry completely before painting: At least 1 hour, though 24 hours is ideal for optimal curing.
6. Use quality primer paint: Specialized brands in the industry like Green Stuff World are the best option for professional results.
7. Don't be afraid to experiment: It can also be sanded with fine-grit sandpaper, modified, and reapplied if something goes wrong.
Applying primer paint is an essential step in modeling and can make the difference between an amateur and a professional job. Choosing the right product type, application method, base color, and compatibility with your paint will make painting much easier and more satisfying. Whether you're just starting or have been painting miniatures for a while, mastering the priming process is an investment in quality, time, and results.
Share this content