How to crackle paint
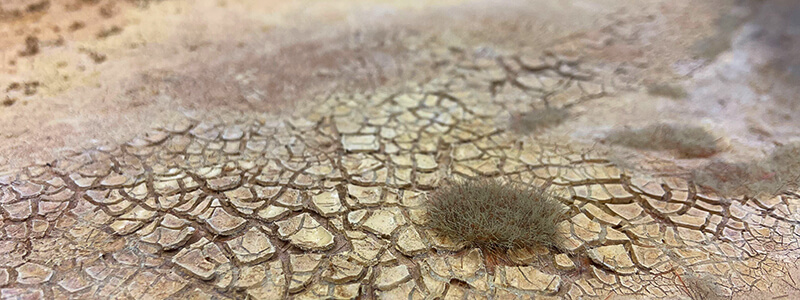
Crazing is a style or technique in which fine cracks or fissures are created on the surface of paints, glaze, ceramic, or other painted pieces, creating non-uniform visible patterns. It occurs naturally with the aging of the pieces, but many people seek this effect to decorate different works of art and parts of miniature projects. In this tutorial, we explain how to crackle paint using the 4 most common techniques, although the easiest is always going to be to use the paints designed for it: crackle paints
How to crackle paint using one component craquelant
This technique can be used on several types of surfaces: wood, glass, ceramics, paper, fabric, cardboard, etc. Before getting to work, make sure that the surface you want to color is completely clean and dust-free. In addition, you must have all the necessary elements to carry out the technique:
• Soft bristle brush
• One-component craquelant
• 2 shades of contrasting acrylic paints, i.e. choose a dark tone for the base and a light tone for the top coat.
• Varnish to protect the result
Crackle painting step by step
Carrying out this technique is a simple task as long as you cautiously follow the following steps:
1. Color the surface with the darkest acrylic paints and let dry completely.
2. Apply a coat of craquelant. It should not be too thick.
3. Let dry the time indicated by the manufacturer of the product. It should not dry completely, but be at a point where, when touching it with your hands, your finger sticks slightly, but without leaving any product on it.
4. Color with a lighter shade on top of the craquelant, creating a layer that is not too thin.
5. Allow to dry completely at room temperature, with the cold air of a hair dryer or air gun.
6. Protect the finish with acrylic varnishes.
Note that the shape and size of the crackers in this effect can vary for many reasons. The direction in which both the product and the final coat of color are applied influences the final cracks pattern, as well as the amount of color used in the final coat. A very thin coat will create very fine and mostly horizontal cracks, while a slightly thicker application will leave a more varied pattern.
In addition, you can place repositionable stencil glue before the craquelant to ensure that the colors do not peel off the surface quickly. If you use this trick from Green Stuff World, there is no need for the final coat of varnish.
How to crackle paint using a two-component craquelant glaze
In this case, the craquelure is applied on top of an already finished work. Normally, it is used on the decoupage technique, with decoupage sheets or on a drawing based on acrylics. The effect will remain on top of them, so a wax patina will be needed to color the cracks on top of the drawing. To compile, the necessary elements for this craquelure are:
• Soft bristle brush
• Two-component craquelant
• Wax patina of the desired color
• Cotton cloth
Crazing with two-component craquelant step-by-step
1. Apply a layer of component A and let it dry.
2. Do the same with component B
3. Once the transparent craquelant is dry and formed, apply the wax patina with a clean cotton cloth until the gaps are stained.
In this case, the wax protects the finish of the work, so it is not necessary to use a protector such as varnish when finishing.
How to crackle paint with glue PVA
In this case, there are two techniques with very different finishes: applying both the PVA glue and the paint with miniature paint brushes, and applying both elements with a sponge.
How to make homemade crazing with PVA glue applied with a brush
This homemade craquelure is one of the easiest to make, it is only necessary to have a soft bristle brush, PVA glue, two paints, and varnish to protect the finish. Optionally, you can use a hair dryer or a hot air gun. Follow these steps to achieve the effect:
1. Paint the base color on the surface and let it dry completely.
2. Cover it with a generous coat of PVA glue.
3. Then paint with the second color, being careful not to drag the glue.
4. Let dry or use cold air from a hair dryer or hot air gun, at a safe distance to avoid bubbles. The cracks will appear in seconds.
5. Once dry, apply a coat of varnish.

Homemade craquelure with PVA glue applied with a sponge
In this case, the procedure is very similar to the previous one, although the technique of applying the PVA glue and the second color changes when using a sponge. Therefore, the utensils you need are:
• Brush
• 2 contrasting paints
• PVA glue
• Sponge
• Varnish
Once all the materials are gathered, follow the next steps:
1. Paint the surface in the desired color and allow it to dry.
2. With a sponge, cover the surface with PVA glue without pressing excessively so as not to create bubbles or lumps.
3. Without letting it dry, do the same with the second color.
4. Wait for it to dry while the cracks appear or use the cold air of a hairdryer to do so.
5. Apply a coat of varnish to protect the final result.
Crazing effect with crackle paints
Although these techniques produce a quality result, there is an easier way to achieve this effect: with crackle paints. To apply it, you only have to do one step: apply a generous layer of color to a surface and let it dry. As time passes, more cracks will appear. Varnish the result so that the effect is not spoiled.
In Green Stuff World, you will find a wide variety of high-quality crackle paints at the best price. These paints effortlessly achieve this effect on your dioramas, models, and miniatures. Now that you know how to crackle paint with different techniques, use them in your projects, and don't forget to show us the results!
Share this content